Beauty or a Beast? Using NDE on Valve Components
When it comes to valves, “beauty is only skin-deep” is often a true statement. Since Superman and his X-ray eyes don’t really exist, there is no way to verify the quality of a valve or valve component just by looking at it.
#components #maintenance-repair
When it comes to valves, “beauty is only skin-deep” is often a true statement. Since Superman and his X-ray eyes don’t really exist, there is no way to verify the quality of a valve or valve component by just looking at it. To discover defects we can’t see with the naked eye, we have to use principles of physics and chemistry to delve deeper into component quality. To do that, we often call upon the techniques of nondestructive examination (NDE).
The American Society of Nondestructive Testing defines NDT as:
“The determination of the physical condition of an object without affecting that object’s ability to fulfill its intended function.”
This makes the use of NDE methods ideal for valve manufacturers that want to evaluate components and still use them in production without damaging them when it is determined that they meet the desired acceptance criteria.
NDE has been used on valve components since the late 1930s. However, the second world war and the infant nuclear industry propelled NDE into acceptability within the valve industry.
The stringent quality requirements, developed and implemented by Admiral Hyman Rickover in the construction of the Nautilus (“Nuclear Navy”), were used by several manufacturers selling valves for use in this critical, highly lethal service. During the mid-1950s, the Manufacturers Standardization Society (MSS) began work on a series of NDE standards for valves that had their genesis in the nuclear valve program of the time. The precepts of these standards are still in use today.
Most of the same MSS committee members were also involved in the creation of American National Standards Institute (ANSI)/American Society of Mechanical Engineers (ASME) B16.34, Valves–Flanged, Threaded and Welding End published in 1973. This document contains (almost verbatim) the same wording of the MSS NDE standards. The B16.34 document still contains the most referenced NDE requirements in the industry, echoing some of the early quality requirements of the nuclear industry.
Although the purpose of the NDE requirements in B16.34 is to allow users to upgrade the pressure rating of valves based on the performance of required NDE, similar requirements and acceptance criteria are referenced in many other applications where added examination is desired.
NDE methods are typically divided into two categories: Volumetric and surface methods. Volumetric methods are capable of examining the entire, through-wall thickness of the part. Surface methods are capable of detecting discontinuities exposed to the surface of the part being examined. Some common NDE methods include:
RADIOGRAPHY
Radiography (RT) is a technique for volumetric examination of a component. Radiography is excellent for detecting defects in castings but is unsuitable for locating defects in forgings where ultrasonic examination is used instead.
RT results have been much debated over the last 20 years as the NDE method was applied to hundreds of castings from low-cost manufacturing companies. To the untrained eye, a radiograph with mild to moderate defects is hard to grade. Even well-trained radiographers sometimes have problems interpreting the film results, especially if they do not regularly “shoot” castings or evaluate casting radiographs.
Radiographic defects are segregated into defect types and levels of severity. These are shown on books of actual reference radiographs published by ASME. The severity levels run from level one–no defects to level five–numerous defects. All of these are in a prescribed geometric area. Additionally, B16.34 lists the locations on the valve components where they should be radiographed and graded; these are called critical areas. A problem with only grading these critical areas occurs when a defect just outside those areas is observed on the radiograph. Technically, that area can’t be evaluated because it is outside the area of interest, even if the defect is horrendous.
To alleviate the potential acceptance of out-of-scope defects, many end users request RT of 100% of the pressure boundary (i.e., the body and bonnet). This eliminates the chance of ignoring or missing defects that are outside the area of interest.
For decades, when radiographic testing was required, the stringent B16.34 acceptance criteria were specified, even though that criteria was originally designed to provide a level of casting integrity allowing the pressure rating of a valve to be upgraded. The intent was never to use the criteria to qualify a standard valve. When RT is required to evaluate valves in standard service applications, the policy of many end users today is to lessen most defect B16.34 acceptance levels by a step. For example, instead of requiring no shrinkage defect be over level two, level three may be specified instead.
Some critical services such as hydrogen and hydrofluoric acid demand the highest quality castings. The radiographic film for these valve components is often interpreted to a higher acceptance criteria level.
RT is also a popular examination method for evaluating weldments. It is especially valuable for spotting inclusions or voids in the weldment, as well as the lack of penetration (incomplete fusion between the weldment and the base material) in the weld.
ULTRASONIC
Ultrasonic examination (UT) is the other main volumetric NDE technique. It is used primarily to examine forged and wrought components, as well as weldments. The industrial UT process is similar to medical UT examination, in that a probe in contact with the couplant-coated area to be examined is gently moved around while the inspector views the results in real-time on a screen (CRT).
In some instances, UT is not preferred for use in castings because the ultrasonic beam reflects off the grain boundaries (inherent in a casting), providing a screen full of false (non-relevant) images. When inspection of the interior of forged valve components is required, UT is the clear choice. However, caution must be taken that components with sharp machined corners are not examined because these can also give false readings. Dimensional UT-based units, often referred to as “D meters,” are used to determine the thickness of various components.
MAGNETIC PARTICLE
Magnetic particle (MT) testing is a technique for inspecting the surface (or slightly sub-surface) of parts of a ferrous component, such as carbon steel or martensitic stainless steels. The operation begins with the application of ferrous powder (typically colored red) to the surface of the part to be checked. After that, a low-voltage, high-current charge is applied to the area via a portable yoke or by inducing a magnetizing current through the entire component.
The magnetized powder is attracted to discontinuities such as cracks on the surface or slightly below. The MT technique is also sometimes used in conjunction with radiography to confirm whether or not a sub-surface (volumetric) defect is very close to the surface.
DYE PENETRANT
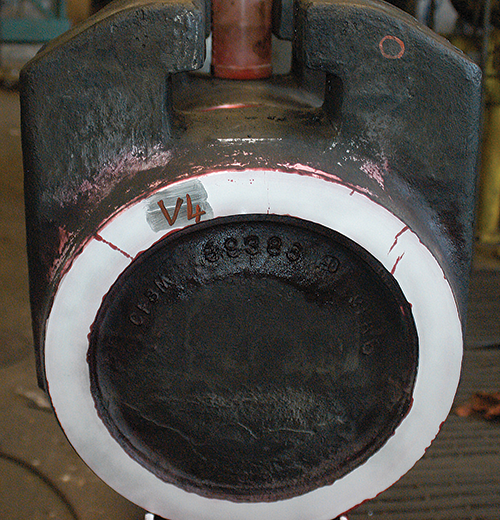
Dye penetrant (PT) examination is also used to detect defects on the surface of a component. Unlike MT testing, PT testing can be performed on any metal surface regardless of chemistry. PT is excellent for discovering cracks or other discontinuities open to the surface, including overall poor surface finish.
PT examination begins by applying penetrant to a pre-cleaned surface of the component. The penetrant is allowed to penetrate into any discontinuities (dwell time) and then the excess surface penetrant is carefully removed. After all the penetrant appears to be removed, a developer is applied to the part. Any issue will show up as a reddish indication or blob of varying geometries, depending upon the shape and depth of the discontinuity. By observing the overall amount of bleed-out of penetrant, a general idea about the depth of a defect can be determined.
Unlike UT and RT, MT and PT testing techniques can be learned relatively quickly. Both of these surface defect indicator tests are useful as in-progress methods of quality assurance during manufacturing.
HARDNESS TESTING
Although not always technically a non-destructive method, hardness testing is a bit different from the examination techniques of RT, UT, MT and PT in that the results of the tests do not directly identify defects. Instead, they’re used to confirm the mechanical properties of a component. For example, hardness testing can confirm whether or not a specific heat treatment has been performed correctly, such as annealing or stress relief.
Many types of hardness machines and devices exist as well as several hardness scales. The most popular hardness scales in the valve industry are the Rockwell C (RC) and Brinell (BHN) scales.
Hardness testing can also be used to estimate the strength of plain carbon steels. Published charts show a correlation between carbon steel material hardness and tensile strength. However, this correlation does not apply to any metallic materials other than plain carbon steels.
Hardness testing of valve components is often performed on components used in sour gas service (H2S). Carbon steels in this service are usually limited to a hardness of RC22 maximum.
POSITIVE MATERIAL IDENTIFICATION (PMI)
PMI is a testing method using electronic devices often containing radioactive isotopes to determine the approximate chemistry of a component or to confirm the probable identity of the material. The most popular technique is X-ray fluorescence (XRF). XRF analyzers determine the chemistry of a test piece by measuring the fluorescent X-ray emitted from that piece when it is excited by an X-ray source.
XRF is a valuable tool for confirming or verifying the chemistry of a sample. Conflicts sometimes arise, however, when a PMI result is used to override a previous laboratory analysis. Portable XRF is not as accurate as modern laboratory methods in use today, but it’s very close.
A new PMI technique that is more accurate and offers more analysis capabilities than XRF is laser-induced breakdown spectroscopy (LIBS). A portable LIBS analyzer can even detect carbon content and verify plain carbon steels, which XRF cannot do.
The third PMI technique is optical emission spectroscopy (OES). OES uses electricity to excite the sample for taking a reading. The technique is also a bit destructive because it slightly melts the surface of the sample. Like KIBS, OES can sense carbon, but unlike LIBS and XRF, an easy-to-use handheld instrument version is not available. OES is usually housed in a sizable system that can be carried in a large backpack or cart, but it is best suited for indoor applications.
INSPECTION OF CASTINGS/WELDMENTS
Two testing areas have garnered the most attention when it comes to NDE of valve components—casting quality and welding quality. Since both are common in valve manufacture and installation, additional focus is required.
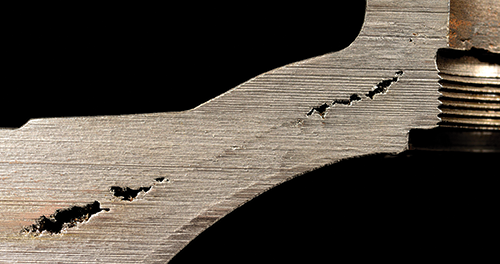
For the last 25 years, products from low-cost countries that have proliferated throughout the industry and supply chain have caused casting quality to be under hyper-focus. The most troublesome casting issues have been volumetric, and these can be divided into two areas—those related to workmanship and those related to performance. While workmanship defects can be indicators of the culture of quality at a foundry, the defects themselves are generally not threatening to the component. Performance defects are a different case, and they should be given much more scrutiny.
Workmanship defects could include lower levels of shrinkage (1-3) or sand inclusions (1-3). While these may be troublesome in a valve used in nuclear or hydrogen service, they are usually not an issue in general applications. Unfortunately, many good valves in the past were discarded because of workmanship defects, even though there was no scientific basis for the rejection.
Many of the misconceptions over casting quality have stemmed from the history of B16.34, its critical areas and its acceptance criteria. An important note here is to remember the genesis of this document—the nuclear valve program. Because the document sprung from that program, the industry assumed for decades that volumetric quality had to be (and was in fact) as high in cast steel valve components. Still, some defects are not okay for any service. Among those are massive level five, and higher shrinkage and hot tears (shrinkage open to the surface).
WELDING DEFECTS
Welding is often used in manufacturing valves—from weld overlays of sealing surfaces to the attachment of pressure-containing components. NDE is often specified to confirm the quality of those weldments.
One of the most important characteristics of a good weld is how the filler material blends into the component to which it is attached. In welding parlance, this is called fusion and penetration. Both ultrasonic and radiographic techniques are used to confirm that these criteria have been met. Of the two techniques, radiography is somewhat easier to confirm results.
Surface irregularities, including a lack of penetration, are verified using both PT and MT test methods. However, the MT testing protocol can only be used on ferrous materials. (Materials that can be magnetized). Crack detection in weldments is performed by both methods, but PT provides a relative indication of how deep the crack could be.
NDE SPECIFICATIONS
Numerous NDE standards and specifications exist. The document most often referenced in valve NDE work is the ANSI/ASME B16.34. This document lists requirements for “special class” valves, which are those that meet specific NDE criteria and as a result, can be re-rated to a higher pressure/temperature class. Over the years, these special class requirements have been specified by end users that require a higher-quality product. B16.34 lists RT, MT, PT and UT acceptance criteria.
To improve the procurement and quality of outsourced products and services, the American Petroleum Institute (API) created Standard 20D, Nondestructive Examination Services for Equipment Used in the Petroleum and Natural Gas Industry. This document has extensive details and requirements to assist purchasers that require NDE examination of their valve components.
As long as castings, forgings and welding are used in making valves, a need for straightforward NDE standards and specifications will exist. Also, until the beauty of all valve components is guaranteed to be more than just skin deep, standards development organizations will continue to create and update their arsenal of valve NDE standards and specifications.
GREG JOHNSON is president of United Valve (www.unitedvalve.com). He is a contributing editor to VALVE Magazine and a current Valve Repair Council board member. He also serves as chairman of the VMA Communications Committee, is a founding member of the VMA Education & Training Committee and is past president of the Manufacturers Standardization Society. Reach him at greg1950@unitedvalve.com.
NDE standards commonly applied to valve components
Radiography
- MSS SP-54 Quality Standard for Steel Castings for Valves, Flanges and Fittings and Other Piping Components–Radiographic Examination Method
- ASME B&PVC Section V, Article 2 Radiographic Examination
- ANSI/ASME B16.34 Valves-Flanged, Threaded, and Welding End
- ASME B&PVC Section VIII, Appendix 4 & Appendix 7
Magnetic Particle
- MSS SP-53 Quality Standard for Steel Castings for Valves, Flanges and Fittings and Other Piping Components–Magnetic Particle Examination Method
- ASME B&PVC Section V, Article 7 Magnetic Particle Examination
- ANSI/ASME Bl6.34 Valves-Flanged, Threaded, and Welding End
- ASME B&PVC Section VIII, Appendix 6
Dye Penetrant
- MSS SP-93 Quality Standard for Steel Castings and for Forgings for Valves, Flanges and Fittings and Other Piping Components–Dye Penetrant Examination Method
- ASME B&PVC Section V, Article 6 Dye Penetrant Examination
- ANSI/ASME B16.34 Valves–Flanged, Threaded, and Welding End
- ASME B&PVC Section VIII, Appendix 8
Ultrasonic
- MSS SP-94 Quality Standard for Steel Castings and for Forgings for Valves, Flanges and Fittings and Other Piping Components–Ultrasonic Examination Method
- ASME B&PVC Section V, Article 4, Ultrasonic Examination
- ANSI/ASME Bl6.34 Valves–Flanged, Threaded, and Welding End
- ASME B&PVC Section VIII, Appendix 12
PMI
- MSS SP-137 Quality Standard for Positive Material Identification of Metal Valves, Flanges, Fittings, and Other Piping Components
- API 578 Guidelines for a Material Verification Program (MVP) for New and Existing Assets
RELATED CONTENT
-
Piping Codes and Valve Standards
As with every intended use for valves, piping carries its own set of standards that valve companies and users need to understand.
-
Creating a Standard for Severe Service Valves
Severe service valves are offered in several standard designs, including non-return, isolation and control types.
-
Intermediate Class Valves, the Forgotten Classification
These days, piping designers use automated systems that default to standard classifications such as pressure classes of 150 to 2500 for valves and associated equipment.


 Unloading large gate valve.jpg;maxWidth=214)

