Electric Actuator Commissioning
Typically, electric actuator commissioning is performed when the actuator is installed at site.
#actuators
Because the installation contractor is the party that often performs the actual commissioning, however, actuator product knowledge is sometimes insufficient, which means the commission is too often performed improperly.
Also, even before the process begins, specification discrepancies, missing components or interfaces, and sometimes poor handling or storage conditions often present problems. Below are some of the installation issues:
- Mechanical: The wrong actuator is sometimes installed. For example, the actuator may be open/close when it needs to be modulating or the actuator could be too small with not enough torque. The orientation, footprint or sizing could be wrong. Fasteners could be loose, or brackets could be damaged or incorrect. When actuators are not stored correctly, the equipment can be damaged before commissioning even begins.
- Electrical: The wrong wiring diagram could have been used, or not enough wires were pulled. Wiring could also be terminated on incorrect terminals. Additional issues can occur onsite from loose or broken electrical connections. Conduit or cable connections could become loose or damaged.
Another consideration in the commissioning process is:
- Device torques: It’s important to be aware of the torques required to operate the device because torque impacts proper commissioning. Also, when process media is influencing the driven device, the unseating or seating torque and the dynamic torque can change during actual operation in the field.
WHERE TO BEGIN
Typically, the sequence for commissioning is:
- Set or verify mechanical stops. Note that varying valve types may require different starting positions. For example, butterfly and ball valves will have different critical end positions.
- Set position switches.
- Calibrate additional items such as the feedback loop, positioner, auxiliary position switches or fieldbus address, if included in the actuator.
End position settings for mechanical purposes
On part-turn/quarter-turn valves, the mechanical stops are usually set by the valve manufacturer. This is easy because the moving device is visible. Usually, some type of closure or leak test is performed.
In the field, setting the stops is generally not needed. However, if the valve is installed and a leak is verified, the mechanical stops may need adjusting:
First, the valve is checked to see if the hand wheel will close it. If it does, the stops are most likely set correctly. Simply resetting the limit switches should take care of any issue. If a fully closed valve cannot be achieved through the handwheel, adjusting the mechanical stop is usually required.
Typically, two types of mechanical stops are addressed: stop bolts in the gearbox housing, which can be one or two bolts, and traveling stops on the worm shaft of the gearbox.
Depending upon the manufacturer, setting the mechanical stops with external stop bolts is done by loosening the lock nut on the side requiring adjustment; turning the stop adjustment screw, and turning that screw in or out for more or less travel (the swing angle).
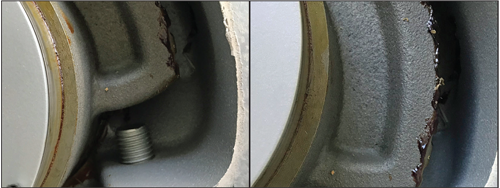
Be aware that, if the stop bolt has been turned out beyond the settable position and the valve still can’t be placed into the required position, it may be necessary to lift the gear up to allow repositioning of the gear box on the valve. Open and closed settings are similar so be aware the segment should not be forced into the gear box housing because damage can occur (Figure 1).
For mechanical end position settings on part-turn butterfly valves, the closed position may be influenced by the seat material or design. The types involved include:
- Rubber, polymer or other “soft” material seats
- Hard metallic seats
For the softer seats, the actuator will put the valve disk into the seat for tight shutoff, stopping on the position (the limit). Butterfly valves with metal seats are typically driven into the sealed position at a specific torque value or torque seating. Regardless of type, the mechanical stop must allow the actuator to drive the disc to the closed position.
For butterfly valves, the open position is usually set at 90 degrees from the closed position. The mechanical stop must allow the actuator to drive the disc to the full open, 90-degree position.
For ball valves, the open position is generally more critical so the ball must be positioned as close to “full open” as possible.
Usually, a mark is placed on the valve by the valve manufacturer showing the centered position for the ball.
The ball valve is usually operated as a stop-on position (the limit). Regardless of gear type, the mechanical stop must allow the actuator to also drive the ball to the closed position so travel may be greater than 90 degrees from the full-open to closed position.
For end position mechanical settings for most linear valves, the “mechanical stop” for the closed position is the actual seat of the valve. As with butterfly valves, this may be soft or hard. The valve manufacturer can verify the type of seating, position or torque.
The mechanical stop for the open position of a linear valve could be the end of thread on the valve stem or the back seat of the valve. Note that this may actually be beyond the actual open position.
For example, a 12-inch gate valve may have 14 inches of stem travel. This extra travel could come into play during calibration or linearity of feedback devices.
End position settings for electrical
When setting the end positions, the actuator should be placed in manual handwheel mode. The new setting position should be approached as the motor is approached so the position allows for possible mechanical backlash.
The manufacturer’s recommended setting procedure should be followed for the type of actuator involved. The setting can be made by a screwdriver or similar tool or via a non-intrusive method.
OTHER ISSUES
Issues that may influence the end- position settings include:
- Seating: Is the valve to be torque or position seated? Even if the valve is torque seated, the end position limit may still need to be set.
Setting the end position limit prior to the torque trip position has several purposes: 1) It indicates to the controls that the valve is in the closed position area and a torque trip can be expected, and 2) it may be used for remote light indication for the closed position. - Coasting: This is the time from which the reversing device (motor starters) drops out (disconnects power to the motor) to the time the motor/gearing physically stops rotating from the inertia of the motor rotor. It may be necessary to set the limit ahead of the actual end position to allow for the coast.
- Excessive torque: Sometimes the actuator torque might not be sufficient to get to the end position because of an unknown valve or installation issue. In this case, suppliers should be consulted.
TORQUE SETTING
The electrical torque switch settings typically can be set at any time.
A caution is needed here: The torque switches should not be set without the consent of the valve manufacturer or the automation center that mounted the actuator to the valve.
Note that changing the actuator output torque setting can damage the mounting assembly between the actuator and the valve or the valve itself.
CONTROLS SETTING
When the actuator manufacturer supplies the controls, those controls can vary from very basic push buttons and starters to fieldbus-enabled, microprocessor-based motor controls. Some of the settings most often requiring calibration, regardless of type, are:
- Torque seating or position seating and whether they are in the open or closed position
- Push-to-run or maintained control in both local and remote cases (open plus closed)
- Position feedback of 4-20mA (output)
- 4-20mA remote positioner operation (input)
- Intermediate position switch or relay
With microprocessor-based motor controls, many of the “calibration” steps required by conventional controls are performed automatically depending on end-position settings. This makes commissioning easier but also introduces many new items that may need attention, such as the actuator or valve’s identification tag, digital relay output programming, digital input programming, local light programming (on or off in mid-travel; green or red for closed or open position), intermediate positions, timer functions and torque warnings.
Microprocessor-based motor controls introduce a time stamp data log. This extremely useful tool can be used for reviewing many of the issues within the actuator and often the remote interface. Unfortunately, an often-overlooked setting is the internal clock of the microprocessor-based actuator. This should be set for the local time at the place of installation.
Conclusion
Commissioning required at the site can be done by most technicians familiar with the site requirements, and the actuators involved. Reading the actuator manufacturer’s operating instructions and programming manual is always recommended and often required.
Unless specifically called for in the engineering specification, commissioning is not typically in the scope of what an actuator manufacturer supplies. However, most actuator manufacturers and their regional distributors or representatives offer some commissioning services, and there is also phone or web-based help available from major actuator manufacturers.
PAUL SOUZA is production application specialist/training manager for AUMA Actuators, Inc. Reach him at paul.souza@auma-usa.com.
RELATED CONTENT
-
Linear Actuators for Automating Gate Valves
Most professionals in the valve industry are already familiar with the use of linear actuators to operate globe valves.
-
Valve Basics: Electric Actuator Controls
Electric valve actuators control the opening and closing of valves. With a motor drive that provides torque to operate the valve, these actuators are frequently used on multi-turn valves such as gate or globe and also on ball, plug and other quarter-turn valves.
-
Actuator Issues? Use This Checklist!
While there may be 40 reasons valve actuators may stop working, there really is only a handful of components that can cause the problems. So, if you have an actuator on the fritz, here are the five things you need to check.


 Unloading large gate valve.jpg;maxWidth=214)